crushcrushcrush: the NE Guide to Compression
Markus back again with the latest blog installment. This week, we discuss…
Crushing It: How to Compressor
We’ve all heard about compressors. Some people say they’re evil and ruining music. Some people pay thousands and thousands of dollars for rare, hard-to-find vintage ones. They’re used in most every song you’ve ever heard recorded. But what exactly do they do? What do those weird, strangely named parameters mean? Where and how should you use one? What if you want one in your rack but you don’t have one? Read on....
First, some disambiguation:
Just to make sure there’s no confusion: we’re talking about audio compression here, not data compression. Compression in this context refers to changing the dynamic content of audio. Data compression, while also used in audio, is a completely different subject and refers to reducing the size of an audio file for easier storage and playback on consumer devices.
How many big words can we use in section titles? Defenestrating prevalent misconceptions
Let’s start by talking about what compression actually does. Often, people complain about compression “ruining music” by making things too loud. Because of this, you may think that compressors make things louder.
This is patently false.
In actuality, the most common type of compressor, the downward compressor, makes things quieter. Weird, right? We’ll explore the different types of compressors later on (and how you can actually use a compressor to make something louder, or at least seem louder) but for now, let’s talk about the controls you’ll find on most common downward compressors.
Threshold, ratio, attack, release, makeup, all that other stuff
There are lots of different designs of downward compressor, but most have these basic parameters in some form and it helps to understand them. Here, we’ll start out looking at Dynamics III, which is included in all versions of Pro Tools (including the free one) and is pretty straightforward.
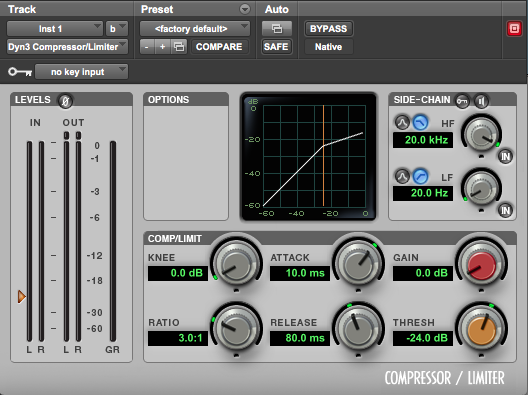
Threshold
Sets the level audio has to reach for compression to begin.
Ratio
This one requires some math. Ratio sets the amount that audio over the threshold is reduced, based on decibels. For instance, if we have a sound that peaks 12dB over the threshold and our ratio is set to 3:1, the sound will be attenuated to 4dB over the threshold.
You’ll see various ratio settings used for different things. However, it’s common to have very low compression ratios (I personally will go as low as 1.2:1) in mastering, but for common mixing tasks I tend to use higher ratios (3:1-10:1). If the ratio is set to 20:1 or above, the compressor basically becomes a limiter, meaning audio will never exceed the threshold.
Attack
Sets how quickly compression occurs upon a sound going over the threshold. For instance, when trying to increase “punch” on drums, having a relatively slow attack that lets the initial transient (impact) of the drum through but then compresses the tail of the kick to lower the dynamic range of the rest of the sound can be very effective. Faster attacks are useful when aiming for more aggressive compression, and even slower attacks are useful when doing gentle compression (again, common in mastering).
Release
The opposite of attack: sets how long gain reduction lasts after attack. Shorter release times mean more aggressive compression since the compressor reacts much more quickly. Longer release times are useful for smoother compression (again, mastering!). Take note: when attack and especially release aren’t tuned properly (generally too long), you get a weird kind of “sucking” sound that you’ve probably heard on some records. Generally it’s not a good thing so be sure to listen for it.
Makeup
This is the part of the compressor that actually adds volume, but it’s literally just a gain knob: in most compressors it doesn’t actually affect compression (except in feedback compressors: more on that later). Going back to my original statement that compressors make things quieter, makeup gain is here to counteract this and allow you to have whatever signal you send in keep its original volume, but with decreased or modified dynamics. Because of this, compressors are known for making signals louder. Since a compressor can be used to lower dynamic range, bringing a signal back to its original peak volume level makes it seem louder because you’ve increased the average signal strength overall. This is just one of a compressor’s uses, though, and shouldn’t be thought of as the only use.
Some compressors have an automatic makeup gain setting that can be very useful: generally they’re designed to keep the level of the output the same as the level of the input no matter the settings.
The more obscure stuff
Obviously, many compressors have other controls. Let’s go over some of the more common weird ones.
Knee
Some compressors have an adjustable knee. The knee is basically the point above the threshold where compression begins. In the compressor above, the white line represents the compression that will be applied to a signal that’s sent into it. At the orange threshold line, there’s a sharp angle where compression will begin. Sometimes, sudden compression like this can sound too abrupt and extreme. A “soft knee” smooths out compression and makes it occur much less abruptly. The sharp angle seen above is replaced with a curve to give a more gradual sound. Sometimes it’s useful, sometimes it’s not!
Peak vs. RMS vs. other stuff
Some compressors have different audio response modes that change how the compressor reads incoming audio. It helps to have a bit of context for this. Peak is a reading of (almost) exactly the level of whatever audio is being measured. RMS is an average volume level taken over about a third of a second. On some compressors, you can set the response mode to peak or RMS (or sometimes other readings as well) to change the compressor’s behavior. Peak will be much quicker, RMS will be slower. I use peak compression a lot for things like drums when I want to bring out the very beginning transient of something like a kick drum to make it punch a bit more and RMS compression on smoother sounds (think strings or pads) when I’m just trying to reduce dynamic range with much less aggressive compression.
Sidechain and filtering
On most compressors, a sidechain is used internally to control what the compressor does. Sidechain audio isn’t heard; instead, it’s analyzed and used to create a control signal that compresses the input signal. Recently, external sidechain inputs have been used to create ducking effects by being sent a kick drum. This creates a very unnatural, albeit useful, type of compression. However, this is not the only use of sidechain controls on a compressor. Some compressors have filters or equalizers on the sidechain so that, for instance, the booming low end of a kick drum doesn’t cause a drum bus to completely be crushed by a compressor. This is extremely useful as the compressor can be tailored to respond to the exact frequency range you want it to to get the best sound.
Wet/Dry
Some compressors have wet/dry knobs. There’s a famous style of compression that I spoke about briefly in our Mixing for Modular blog posts (parts one and two: go check those out if you haven’t!) called New York compression. In this method, you split an audio signal and compress one heavily and leave one dry, then mix them back together. Most commonly, this is used on drums and percussion. Doing this can be useful as you get some of the aggressiveness of a heavily compressed sound and the dynamics of an uncompressed sound as well. A wet/dry knob lets you do this easily and dial in the mix of compressed and uncompressed signals without having to configure auxes (or in a modular context split a signal and then use up a mixer).
Types of compression
We’ve been mostly talking about the most common type of compression, feed-forward downward compression. However, there are a few other things we should mention here.
Feedback compression
In a feed-forward compressor, the input signal is split into the sidechain for controlling the compression amount and the actual compression circuit for, well, compressing. In a feedback compressor, the sidechain is fed by the output of the compressor, not the input. The 1176 is a famous example of a feedback compressor.
Limiting
Most famously, limiting is used in a mastering context to bring up the loudness of a track. From an interface standpoint, most limiters let you set the maximum volume your signal will reach, although this control will generally be available only at the expense of not choosing a ratio control — that is, you can choose to compress or limit. When limiting, you will still typically have some controls similar to a standard compressor (threshold or input gain, release, sometimes much, much more). This is where the “compression makes things loud and loud is bad!!!1!1!” concept comes from. While overcompression of any kind generally sounds bad, using a limiter to bring up the volume of a track doesn’t have to be aggressive (and doesn’t mean you have to take all the dynamics out of your track). Check out our Mastering for Modular post if you want to learn a bit more about limiting in a mastering context!
Limiting also has its uses in recording: many high-end preamps employ limiters (or soft clip input signals to effectively peak-limit them) to eliminate clipping when they’re converted from analog to digital and recorded.
Upward compression
This is a variant of downwards compression, but instead of bringing loud sounds above a threshold down and leaving quiet sounds alone, it brings quiet sounds below a threshold up and leaves loud sounds alone. It’s not super common, but it can be very useful, so keep it in the back of your mind when mixing. Remember when we talked about parallel compression in the wet/dry section above? Parallel compression is actually a type of upward compression. Cool!
Expansion/noise gates
Expansion is kind of the opposite of the type of compression we’ve been discussing so far, in that it actually increases dynamic range by lowering the volume of sounds below a set threshold. Noise gates are a type of expander.
Multiband compression
Multiband compression is a technique that got extremely popular in recent years. A sound is split into multiple frequency bands (three is probably the most common number) and each frequency band is then compressed separately. The sounds are then mixed back together. Very common in mastering, and also, interestingly, sound design, thanks to a famous preset in a popular DAW’s multiband processor.
Compression that happens that you may not notice
As we’ve talked about, compression is simply a change in dynamic range (most often a reduction). There are some processes that can “compress” audio that aren’t dedicated compression units. The most common one of these is distortion, especially drive-based processes. Think about it: when you overdrive a signal, it gets louder, and then clips. That means that quiet things are brought up in volume and louder things stay roughly the same once they hit the clipping point (though they become much more distorted).
Compression in Eurorack
Obviously, compression is a useful tool. How do we bring it into our Eurorack system?
Dedicated compression modules
Obviously, the most straightforward way is with a dedicated compressor. There are more and more popping up on the market, and many have CV over compression parameters which allows for interesting experimental processing. My personal favorite is the WMD MSCL (we at Noise Engineering have a total of six MSCL’s: they’re really fun!), which is a stereo compressor with a sidechain input. It’s only got a few controls, but it sounds very good. The sidechain input also opens up a lot of possibilities for more delicate processing. Remember how we talked about sidechain filtering before? I’ll often run a mix through a MSCL to glue things together. However, my patches tend to have a lot of low end, which quickly eats up the compressor’s headroom and can create a lot of compression artifacts. To remedy this, I’ll split my mix out to a highpass filter and run the filtered signal into the MSCL’s sidechain input to remove the difficult-to-manage part of the mix from the detection circuit.
There are plenty of other compression modules that exist with different features, such as the Intellijel Jellysquasher, L-1 Microcompressor, and the upcoming Schippmann Cook compressor. Fun stuff!
Patching a compressor
Of course, you may not want to dedicate rack space to a compressor. One can be patched together relatively simply with an envelope follower, a signal inverter, a VCA, a mult, and maybe some other utility modules for more interesting compression.
First, we have to split the signal into two parts: the signal to be compressed, and the sidechain detector patch. Any mult will do so I’m using an Extra Mullet. I have one of the split signal going into an envelope follower (any will do but for this example I’ll use the slew in the upcoming Sinc Bucina, more on that in a bit) to give us a control signal based on the dynamics of the sound. This signal then needs to be inverted (since we’re doing downwards feed-forward compression in this example). Using Roti Pola, I use channel 1 as an offset fully clockwise, and feed the envelope follower signal to channel 2 where I can invert and attenuate it. This signal is then fed to a VCA’s CV input. The other copy of the audio signal passes through the VCA, and we have our compressor! Here’s what it looks like:
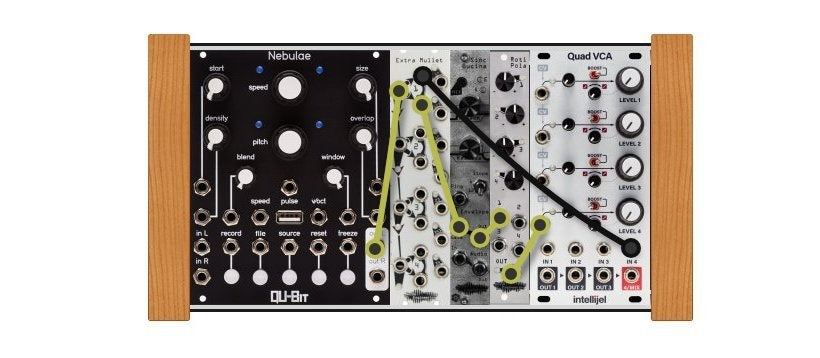
A bit of an explanation: Sinc Bucina’s (same in this context as Sinclastic Empulatrix, if you have one of those instead) envelope is actually a slew, and it basically ignores negative voltage going into it, which is great for us because we only want a monopolar envelope. Using the attack and release controls give us the same controls as those on a normal compressor. That envelope signal is inverted by Roti Pola. I’m using the Intellijel QuadVCA because it gives us a lot of different control options. There are two important ones here. First there’s level, which lets us open the VCA completely and use the CV signal to close the VCA and create compression. If your VCA doesn’t have this, you can offset the envelope with RP’s first channel and use that to keep the VCA open instead. Second are the CV attenuators, which basically act as the ratio control. If your VCA doesn’t have that either, you can use the attenuverter on RP.
This is a pretty basic patch but it sounds really nice. Here, I’m adjust the attack, release, and “ratio” to get different compression results. Remember how I mentioned that this kind of compression actually makes stuff quieter? I’m making up for that by adding gain at my mixer.
This could further be expanded, though. Filtering the control signal before it enters the SB envelope follower would allow for sidechain filtering like we discussed before. If we don’t invert the envelope, we can use it as an expander! Since it’s just a patch and not a self-contained module, you can really get creative and achieve a lot more than you could with a normal compressor. Cool!
Ducking: you don’t need a compressor
Using a compressor for sidechain ducking like we talked about before is a super common use for a compression module. However, it’s not always the best way of achieving this effect in the rack. If you’re ducking multiple sounds, you need to submix them and then run them through a compressor, which can use quite a few modules for a simple effect.
I actually don’t use a compressor to achieve this. My mixer, the WMD Performance Mixer, has a VCA for each channel, meaning I can use voltage control to adjust the volume of whatever channels I like. Pons Asinorum has an attack envelope setting: it basically acts as an inverted decay envelope. I mult the trigger from my kick drum to PA and then use one of those envelopes to duck the volume of whatever channels need it on my mixer. It sounds great, it’s easy, and it doesn’t use another mixer.
One final note
Compression is fun, and it’s just one more tool to have at your disposal. It doesn’t just have to be a sterile mixing utility, it has creative uses as well, so no matter what you do with sound, understanding this concepts can be very helpful. Knowledge is power!
On a similar note, we have a post coming soon all about ducking in Eurorack… both with and without a compressor.
Interested in more mixing? We have two posts all about mixing (check them out here and here) and a post all about mastering, too!