How to plug in a module
We all love to play with a Eurorack system. But I still clearly remember the fear in my heart the first time I actually had to plug in a eurorack module. It’s tricky, and there’re a few different things that can go wrong. Follow this quick and easy guide to get your new modules up and running correctly!
Wait, why do I need a guide for this?
Short answer: because we get this question from users All. The. Time.
Longer answer: Eurorack is a format designed with only a few standards for how things should be done. The one standard that has been almost universally adopted, though, is the power connector. While this does mean that you can run almost any module off of almost any case, the connector itself has a few issues: mainly, it can be plugged-in in a variety of incorrect ways. Noise Engineering modules have some protection built in so that it’s relatively hard to break them by plugging them in wrong, but not all modules have this and doing so can potentially damage your system. So how do we do it correctly?
Let’s look at the power connectors first
To install your module, you’ll need to plug one end of a ribbon cable into your module, and the other end will connect to the power distribution in your case. In your case, the power will either come from a busboard (a circuit board with a row of power connectors) or a flying bus cable (another ribbon cable with a row of plugs on it). The connectors in your case will always be 16-pin connectors, and the connector on your module could either be another 16-pin or a 10-pin connector. Those connectors are wired like this:
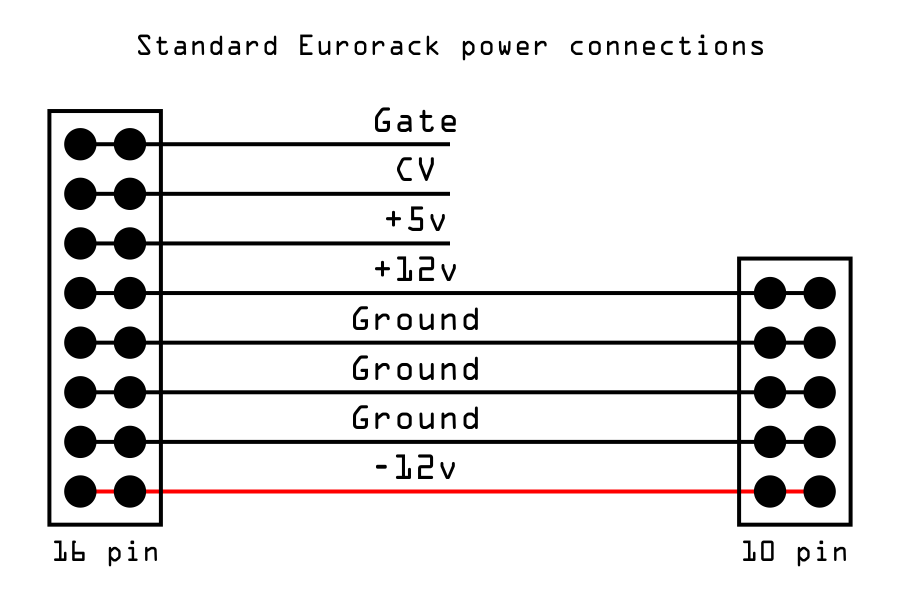
On the left, we have the pinout of the 16 pin connector, and on the right we have the pinout of the 10 pin connector. I’ve put a red stripe across the -12v rail because most ribbon cables will have a red stripe at the bottom like this. To play devil’s advocate, though, I’ve also seen blue stripes, and a few don’t use this standard (Cwejman puts their red stripe on the +12v rail instead), so it’s best to go by actual power labeling when possible.
Many manufacturers label what pin is what on their modules, but some don’t; when they don’t, there will usually be a strip across one end of the power connector on the module. That should be the -12v indicator.
And, of course, a few companies have modules that don’t have any labeling on them: Doepfer is a notable example, and they have a guide for what orientation the power connection should be on their modules. It’s always worth checking the manual for a module if there’s not labeling on the module itself.
Oh, and once, on Sinc Iter, we cut off the labeling when we accidentally placed a part over it. If you’re trying to plug one in, the -12v is at the bottom. Sorry about that!
Let’s actually plug something in
Now we know that our busboard and our module have matching power connectors, and that the -12v rail is a good indicator of what orientation our ribbon cable should be plugged in. Let’s get some power going! First, TURN OFF YOUR CASE. You should always do this before you plug in (or even move) a module. Our inbox has seen numerous emails from unhappy people who have shorted things while sliding them down a row while still turned on.I like to plug the ribbon cable into my case first. Assuming you’re using a standard power cable, find the red stripe and plug the 16-pin connector into the busboard/flying bus so that it covers all 16 pins with the red stripe across the -12v connection. (Note: flying busboards usually have a red stripe on them, so you can match red stripe to red stripe. If you’re concerned, there will probably be labeling where the busboard connects to the power module, so you can double-check that the flying bus is plugged in how you expect.) Plugging in the connector shouldn’t require too much force; if you’re met with a lot of resistance double check that the connector is lined up with the pins correctly and that none of the pins are bent out of place. If they are, GENTLY bend them back with your fingers (make SURE your case is turned off first, though!). Once that side is plugged in, plug the other end into your module the same way. Make sure the red stripe is going to the -12v side of the connector.
A note: Some power distribution and modules have keyed headers that only let the cable attach one way. This is helpful, but can sometimes still be incorrect (more on that later) so still double-check everything is going in the way it’s supposed to.
Does size matter?
Sometimes you get your module ready to go and notice that you have a 16-pin cable but oh no! Your module only has a 10-pin header! What to do?
Never fear, as long as you line up the red stripe, you can still use the cable with the smaller header, as long as it fits (that is, if it’s keyed, it won’t fit. And sometimes it won’t fit if there are other things around the header that make the overhanging bits of the larger header unworkable).
Common mistakes
The most common and talked about issue is plugging things in upside-down, but if you’ve followed the instructions here, you’ll be fine. Another place mistakes can happen: I often find myself plugging things in the correct orientation but with pins offset. This is easy to fix as well as it’s very obvious visually when it’s not quite seated correctly. I always double-check the connections before I turn my case on the first time just to make sure I haven’t made a mistake like this.
Bad cables
Adding to our difficulty here, sometimes cables can be made incorrectly. 16-to-10 pin cables are a common culprit for this, so if a cable looks bad or offset on the 16 pin end, it’s a good idea not to use it. Also, like any cable, power cables sometimes just go bad! It’s rare, but it does happen. If your module is not working, try plugging it in with a different power cable to see if that resolves the issue. There’s another common way cables can be made incorrectly, too, and it’s a bit more subtle...
Keyed headers
Some modules and power distribution use “keyed” headers, meaning that the ribbon cable can only connect to it one direction. This is great, assuming the cable is made correctly, but forces the cable into the WRONG orientation if the cable is assembled wrong! It’s always a good idea to double check the labeling on the module to make sure it lines up correctly, even when using keyed headers, for this reason. Trust, but verify.
I still need help!
If you’re having trouble with getting your new Noise Engineering module installed, drop us a line. And really, all modular makers we’ve ever talked to honestly want you to have a good experience with their products. Always check the manual, and if you need help installing a product, always ask the manufacturer. We’re here to help!